Want to add a trolling motor to your kayak? As someone who’s installed over 50 of these setups in my repair shop, I can tell you it’s a straightforward project – if you know the critical steps. Poor mounting or inadequate waterproofing will transform your kayak into useless junk. I’ll share the exact process I use to get reliable, water-tight installations that actually perform on the water.
The key is precision in both placement and mounting technique. I’ve seen too many DIY jobs fail because folks rush through without understanding the basics. After 15 years of fixing botched installations, I know exactly what works and what leads to expensive mistakes.
Some of the links in this article may be affiliate links. If you make a purchase through these links, we may earn a small commission at no extra cost to you. Thank you.
This guide strips away the fluff and focuses on proven methods that keep your motor secure and your kayak tracking true. Let’s get your setup done right the first time.
Essential Tools and Materials Needed
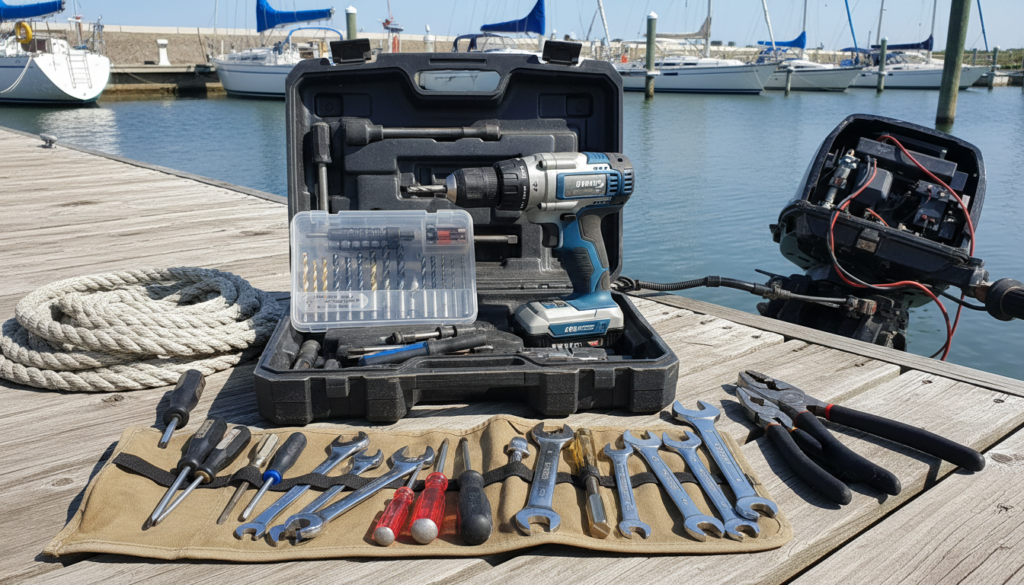
Five essential tools form the backbone of any kayak trolling motor installation.
We’ll need a complete drill kit with bits, screwdrivers, wrenches, and pliers to handle the mounting hardware effectively.
Don’t skimp on marine-grade screws and bolts – they’re vital for fighting off saltwater corrosion.
For a bulletproof setup, we’re using stainless steel shelving brackets with locking nuts to keep your motor mounted securely.
Smart addition: Teflon tubes protect your control lines from wear as they snake through the kayak’s body.
Finally, a waterproof box is non-negotiable – it’ll shield your battery and speed controller from splash and spray.
Trust us, water and electronics don’t play nice together, so this protective housing is essential for your motor’s longevity. Additionally, ensuring proper battery placement will enhance both safety and performance in your kayak setup.
Selecting the Right Motor Mount Type
While universal mounts offer flexibility, they’re not all created equal – let’s zero in on the mount types that’ll actually keep your motor where it belongs.
We’ve tested countless trolling motor mount options, and here’s what you need to know about the top contenders:
| Mount Type | Pros | Cons |
|---|---|---|
| Railblaza Kit | Quick-release, durable | Requires drilling |
| Budget Holders | Cost-effective | Limited stability |
| 4-Bolt Stern | Maximum security | Permanent install |
For kayak motor setup success, we recommend the Railblaza transom mount if you’re comfortable with drilling. Need adjustable features? The Brocraft’s your pick for motors under 35lbs thrust. Don’t cheap out on budget mounts – they’ll cost you more in frustration than dollars saved. Additionally, ensure you choose a mount that can accommodate the thrust needed based on your kayak’s weight and intended use.
Step-by-Step Installation Process

Now that you’ve picked the right mount, let’s get down to business with the actual installation.
First, we’ll prepare our fishing kayak by marking the mounting location – rear for traditional trolling motors, bow for spot lock systems. We’re using marine-grade hardware here, no compromises.
Next, we’ll secure the mount using stainless steel bolts and lock nuts.
For wiring, we’ll run 6-gauge marine wire from the mounted motor to the battery, adding that essential 60-amp fuse for protection. Keep the wire routing clean and avoid unnecessary holes in your hull.
Final step: water testing. Quick-release mechanisms allow for fast motor detachment and attachment, enhancing user convenience during your outing.
We’ll launch and check the motor’s performance, making sure our mounted setup is stable and easy to install correctly.
Adjust the depth and angle until everything’s perfect. No wobbles, no loose connections – just clean, efficient power.
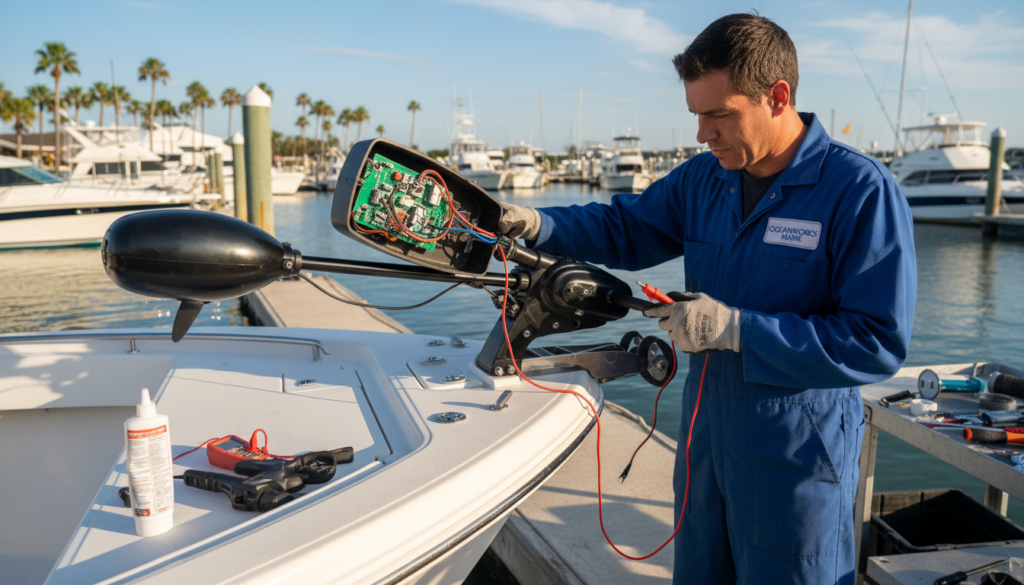
Wiring and Battery Setup
Since proper wiring makes or breaks your trolling motor setup, let’s tackle the electrical system with military precision.
For a MotorGuide Xi3, we’ll connect a 12v 50ah LiFePO4 battery using six gauge marine wire and a 60 amp fuse – this combo handles typical kayak loads without breaking a sweat.
If you’re running a Minn Kota Ulterra, you’ll need two 12v batteries wired in series for 24v output.
Here’s the non-negotiable part: waterproof every connection like your life depends on it. Salt water’s brutal on electronics, and we’re not taking chances.
Keep your wiring routes simple and avoid drilling unless absolutely necessary. Remember, every hole in your kayak is a potential leak point, and we’re aiming for a clean, professional installation that’ll last for seasons. Additionally, ensuring voltage stability in your wiring setup is crucial for preventing system overload and enhancing performance.
Safety Checks and Testing
Before you dream about landing trophy fish, let’s nail down the safety checks that’ll keep your trolling motor setup from becoming an expensive anchor.
Start with the basics: double-check every bolt on your mounted trolling motor. Loose hardware isn’t just annoying – it’s dangerous.
Next, we’ll verify weight distribution by loading your kayak with gear and ensuring it stays level. Don’t skip the wiring connections inspection – look for corrosion, wear, and proper battery placement.
Time for the real test. Take your rig to calm water and run through every control function. Check throttle response, steering, and overall performance.
Watch how your kayak handles under power. If something feels off, fix it now. Trust us – discovering issues mid-trip isn’t anyone’s idea of fun. Regular maintenance checks can significantly prevent performance issues that may arise during your outing.
Frequently Asked Questions
Can You Mount a Trolling Motor on Any Kayak?
While we’d love to say yes, not all kayaks offer motor compatibility. We must consider kayak stability, weight distribution, battery placement, and available mounting techniques before adding a trolling motor.
Do You Have to Register a Kayak if You Put a Trolling Motor on It?
We’ll need to register our kayak when adding a trolling motor, as most state boating laws require registration for motorized vessels. Check local kayak registration requirements and motorized kayak safety regulations in your area.
How Fast Will a 55LB Trolling Motor Go on a Kayak?
Like a gentle river current, we’ll typically see our 55lb trolling motor pushing us between 3-5 mph, though our actual speed depends on kayak weight, stability, battery performance, and water conditions.
How Deep Should Trolling Motor Be in Water for Kayak?
We’ll want our trolling motor depth at 12-18 inches below the surface for ideal performance. This guarantees proper kayak stability, reduces water resistance, and maintains motor efficiency in most conditions.